To Blog or Not To Blog?!?

Wow! I can not believe that almost a year has gone by since I last published a blog post! What happened?!

I’ll tell you…..YouTube…..YouTube is what did it! I got really into making YouTube videos. I discovered a unique kind of joy from filming YouTube videos. I enjoyed every aspect from planning, to filming and editing. I have learned a lot over the last year when it comes to editing videos. The program that I use to edit videos, I’ve been using for roughly a year and a half and it wasn’t until a year later that I found out that I could insert a photo while still playing the video. In my previous software, I would have to pause the video, insert a picture and then continue the video. Mind blowing!

Aside from the joy of creating videos, I have met some incredible friends through the YouTube hashtag of Friday Sews. It has definitely been an incredible journey so far.

Which brings me to my blog……

To blog or not to blog!

#FridaySews

Hello!

I wanted to let you know about a fun hashtag over on YouTube. It was created by Jen from Today in Jen’s Sewing Room. She created this fun hashtag for Friday, where sewing vloggers post a video on Fridays talking about their week with sewing and with life. It is a lot of fun and such a great community! I always look forward to Fridays to see what the other sewing vloggers have been up to. I’ve participated a few times already and absolutely love it! Each week, more and more vloggers are joining!

Here is my most recent #fridaysews video!

Be sure to go to YouTube and in the search bar type in: #fridaysews and you’ll be able to see all of the vloggers participating!

I hope you enjoy #fridaysews videos as much as I do!

“You were always kind and caring and so understanding too, And, if help was ever needed Dad it so freely came from you.” — Author Unknown

Lamma Hoodie | Itch To Stitch Patterns

Hello!

I apologize….I’ve been neglecting my blog and really focusing on my YouTube channel. I will try my best to focus on both!

Today, I have a fun pattern review for you and it’s all about the Lamma Hoodie by Itch To Stitch Patterns.

The Lamma Hoodie is a PDF pattern that comes in sizes 00-40 and calls for fabrics with at least 25% – 35% horizontal stretch such as: french terry and jersey. The patterns has a lot of different options: regular or full bust, a hoodie or a cowl neck and cuffed or thumbhole sleeves. It features raglan sleeves and princess seams with front inseam pockets within those princess seams. It really is a great pattern for color blocking options!

For my version, I sewed a size 6 regular bust with no alterations. I sewed the cowl neck with cuffed sleeves. I’m 5’9″ my measurements are: Bust 36, Waist 31, Hips 38. I sewed mine using a floral scuba fabric that I purchased from my local fabric shop back in 2018 or 2019 and a stretch velvet in dusty rose from Overseas Fabric.

I’m really happy with this pattern and the fit. The downside is (not pattern at all) I’ve washed the floral fabric twice – once prior to sewing and once after wearing the hoodie a couple of times and the floral design is already fading and peeling off. Other than that, I’m really happy with this make.

I didn’t add a drawstring because my machine had a mishap while I was sewing the button holes. They didn’t turn out the greatest, but that is okay as the cowl rolls over and the button holes are hidden. I also decided to leave the inseam pockets out, as the scuba fabric is quite thick and I didn’t want to add any bulk to the hoodie.

The inspiration for this project came from Karina from Lifting Pins and Needles. She made a beautiful red velvet version and I absolutely fell in love with it and knew that I needed to sew a velvet one too! Her red version was my inspiration for the dusty rose velvet! She has a whole video for the Lamma Hoodie and you can watch it here. Be sure to check out her YouTube Channel!

(I asked for Karina’s permission to use her photo)

Karina’s Red Velvet Version! Red is definitely her color!

Now, for the fun part of this pattern review is, I had mentioned back in January (after the Lamma Hoodie release) that I was interested in sewing it and a couple of my friends on Instagram also mentioned that they too were interested in sewing the Lamma Hoodie. I asked both of them if they’d be interested in sewing it together and they both said yes. I created us a Facebook group called “Lamma SewTogether”. It was a really neat experience as we were able to bounce ideas off of each other and post progress photos. I really liked the idea of creating the Facebook group so that I could log onto Facebook and see what my friends were up to when it came to sewing the Lamma Hoodie. I sometimes find social media overwhelming at times, so this created a place I could log into and see exactly what they were up to without being distracted by other posts and such.

The best part is….we each sewed ourselves a variation of pink fabrics and we didn’t even plan that! How cool is that?!\

I had so much sewing the Lamma Hoodie with Meg and Rikki. Definitely check out their instagrams:

Meg: https://www.instagram.com/meggiesews Meg also has a blog that can be found here. She also has a blog post about her Lamma, that can be found here.

Rikki: https://www.instagram.com/rikkisews

Meg’s Version – Those colors are stunning on her!
Rikki’s version -Isn’t Rikki gorgeous in this fuchsia Lamma?!? Fuchsia is my favorite color!

(I asked Meg and Rikki for permission to use their photos in my blog post)

Thank you ladies for sewing the Lamma Hoodie with me, I had so much fun! We will definitely need to do this again for a future sewing project!

Will I make this pattern again? Absolutely, hopefully sooner rather than later! My next version will include a hood and inseam pockets!

Thank you for taking the time to read my experience sewing the Lamma Hoodie!

“The only thing missing from your birthday celebration was YOU, dad.” — Me

My First Style Arc Make!!

I honestly do not know what took me this long to sew a Style Arc pattern! I’ve heard people say how beautiful the fit is and how well drafted the patterns are. I guess it took a Black Friday Sale for me to final give in and purchase my very first pattern. This is the Kristy Woven Top Pattern by Style Arc.

When you purchase a PDF pattern from Style Arc, you only receive one size. I picked a size 10 based on my measurements and their measurement chart. I’m really happy with the fit of the size 10.

I used a textured dotted viscose fabric from my local fabric store. This is the very first fabric that I purchased when the fabric shops were allowed to re-open back in June. Unfortunately, right now as I type this, our fabric shops are closed. In fact, one store actually stopped providing the curbside pick up service. I’m not too sure why. But anyways, this fabric will always remind me of how excited I was to go back into a fabric store…it was amazing. I can’t wait to be able to do that again!

This was my very first time sewing a rouleau loop, and I’m pretty sure I sewed the loop to the facing and the back facing to the blouse wrong. But it looks fine. I’m definitely going to be sewing this top again very soon and I will try another way of attaching the loop to the facing and the back facing to the top. I tried to find a pink or purple button, but was unsuccessful, so I used this black button. I think the black button looks beautiful.

Some things to note about this pattern:

  • The pattern instructions are similar to Burda Style – very minimal and maybe 1 photo (of a tricky step). There was a total of 14 instructions for this top.
  • The sleeves have a dart, but the instructions do not instruct you to sew the dart, so don’t forget about the sleeve dart if you do end up sewing this pattern.
  • Pattern does not instruct you to stay-stitch the neck or the arm holes. With this lightweight fabric, I would suggest stay-stitching. I didn’t on this make, but I will for my future makes.
  • On the styled pattern photo – the sleeves look a bit longer. I even lengthened my sleeves by one inch.

Will I make this pattern again? Absolutely, right away actually. I really enjoyed sewing this. The pattern pieces came together beautifully. I haven’t had that happen in a long time! It was simply beautiful the way they all came together. For my next make, I will lengthen the sleeves again (I’m not too sure by how much yet), I will stay-stitch the neck line for sure and I’m even considered doing a double flounce – I will need to see how much fabric I have!

I hope you enjoyed this make as much as I did!

“Dad, you are missed and loved beyond measure. I miss you everyday.” — Me

First Make of 2021!

Happy New Year!

Sapporo Coat | Papercut Patterns

This is my first make of 2021! All of the details can be found on Minerva. I was gifted the outer fabric from Minerva in exchange of a blog post, all opinions are my own. Please head to the Minerva site to read all of the details.

I purchased the PDF pattern and the lining myself. The lining fabric is from Fabricville.

“Christmas isn’t the same without you dad. I love and miss you everyday.” — Me

Goodbye 2020, Hello 2021!

Can you believe that it will be 2021 soon? 2020 has definitely been a year. I’ve been ready for a while to close the chapter on 2020.

I wanted to write a blog post about my top hits and misses of the year, but when I look back at my sewing projects – I really didn’t get much sewing done actually.

Despite what was happening in the world, I’ve been very conflicted with my blog. I started to get back into crafting the last few months. It has been a nice break from sewing while still remaining creative. I’m conflicted because I actually started a new Instagram and Blog account for my crafting projects. I did this because the vibe on my sewing account was becoming more and more negative as the year progressed and I wanted to see more positivity in my sewing and crafting adventures. I often use Instagram to seek inspiration or ideas for my own projects. Now, I haven’t published my crafting blog to go live yet and I’m not too sure when or if I will. Is it possible to work at 2 blogs and keep up with the both of them? That answer I’m not too sure about.

Lets look ahead to 2021!

I decided to take full advantage of some of the amazing Black Friday sewing sales. I bought a few new patterns – from Independent Companies that I have never tried before and I also purchased a bra kit from Emerald Erin. My Black Friday purchases have really influenced my Make 9 for 2021.

Starting at the top left:

  • Double Zip Hoodie – Millicent Joy Sewing Patterns
  • Cindy Jean Jacket – Style Arc
  • Around The Block Hoodie – Ellie and Mac Sewing Patterns
  • Black Beauty Bra – Emerald Erin Sews
  • Rudeneja Handbag – Lavender and Twine
  • Lark Tee – Grainline Studio
  • Ash Jeans – Megan Nielsen
  • Kristy Top – Style Arc
  • S8855 – Simplicity

Have you sewn any of these patterns? If so, I’d love to hear which ones!

Love and miss you VERY MUCH dad! – Me

YouTube Tutorials

Hello All,

I’ve finally tried something new with my YouTube Channel….I made, not one….but two video tutorials.  The video tutorials are roughly the same, one is for the Girls Sunday Romper Pattern by Love Notions and the second video is for the Ladies Sunday Romper Pattern by Love Notions.

You know, when I first started my YouTube Channel, that is exactly what my original intentions were.  I wanted to create videos in which you could sew right along side me and pause the video when ever you needed to.

Why did it take so long to do?  Well, I actually tried to film a couple in the past but they just never seem to work out.  I just never knew which method to use in order to film a tutorial type of video.

Let me tell you……it’s a lot of work!  I knew, going in that it would be a lot of work……but, WOW!  It really is a lot of work.  Yet….they are still not perfect.  I know with work, time and patience my overall video quality will improve.  We all need to start somewhere right!

The first video that I made was the Girls Sunday Romper.  I used my main camera for the showing of the pattern pieces and the pinning portions.  I used my old old basic camera to film the footage at the sewing machine.  I was mumbling as I was talking to the camera (as I didn’t want my husband to hear me).  So while I was editing the video, I actually cut out my voice and I did a voice over using the narration feature in my editing software.   I later learned that the narration feature doesn’t allow me to turn my voice volume up.  So in the final YouTube video, the sound difference between my voice and the music is significant.

Once I realized I was having voice problems on my first video, I then decided that I would use my main camera for the pattern pieces and pinning portions, but instead of mumbling, I’d have to make sure that I was talking nice and clear – as that’s the voice that I would use for the final video.  I think this way turned out much better.

Things to work on in the future would be, better lighting at the ironing board or cutting mat.  I mostly sew in the evenings when my daughter is sleeping, so lighting is a big factor as to why it took me so long to film a tutorial.

In the past, I tried to use my microphone to film the pinning sections – but that turned out to be a nightmare with syncing my voice to the camera.  Luckily, my main camera has a nice microphone on it that I can record with or without a microphone.


I will definitely need to invest in a second tripod for my second camera for filming at the sewing machine.

These are the 2 videos.  I’d love to hear your constructive feedback on my two videos.  Besides lighting, what are some other things you think that I should consider for my future tutorial videos?  Perhaps maybe you even have some tips and tricks you’d like to share with me?!

Thanks for reading!

*This post contains affiliate links.  What that means is, if you make a purchase through one of my links, I receive a small commission at no extra cost to you.

“Dad, I miss and love you VERY MUCH.” — Me.

Pattern Testing | Heidi Dress

I believe one of the best things about sewing is, when you can sew a dress that is absolutely gorgeous, yet very very easy to make!


IMG_1590

This is that make!  Easy to make, gorgeous to wear!

The Pattern:

This is the Heidi Dress by AKpatterns.  I was fortunate to pattern test this pattern and it was such an enjoyable experience, everyone in the testing group was very supportive of each other!

At the time of testing, the dress was available in one length, but Athina has made the dress available in 2 different lenghts; a midi and a knee length.

The pattern has 2 views, version 1 has ruffles on the bodice along the princess seams and version 2 does not have ruffles on the bodice.

Heidi_LineDrawings

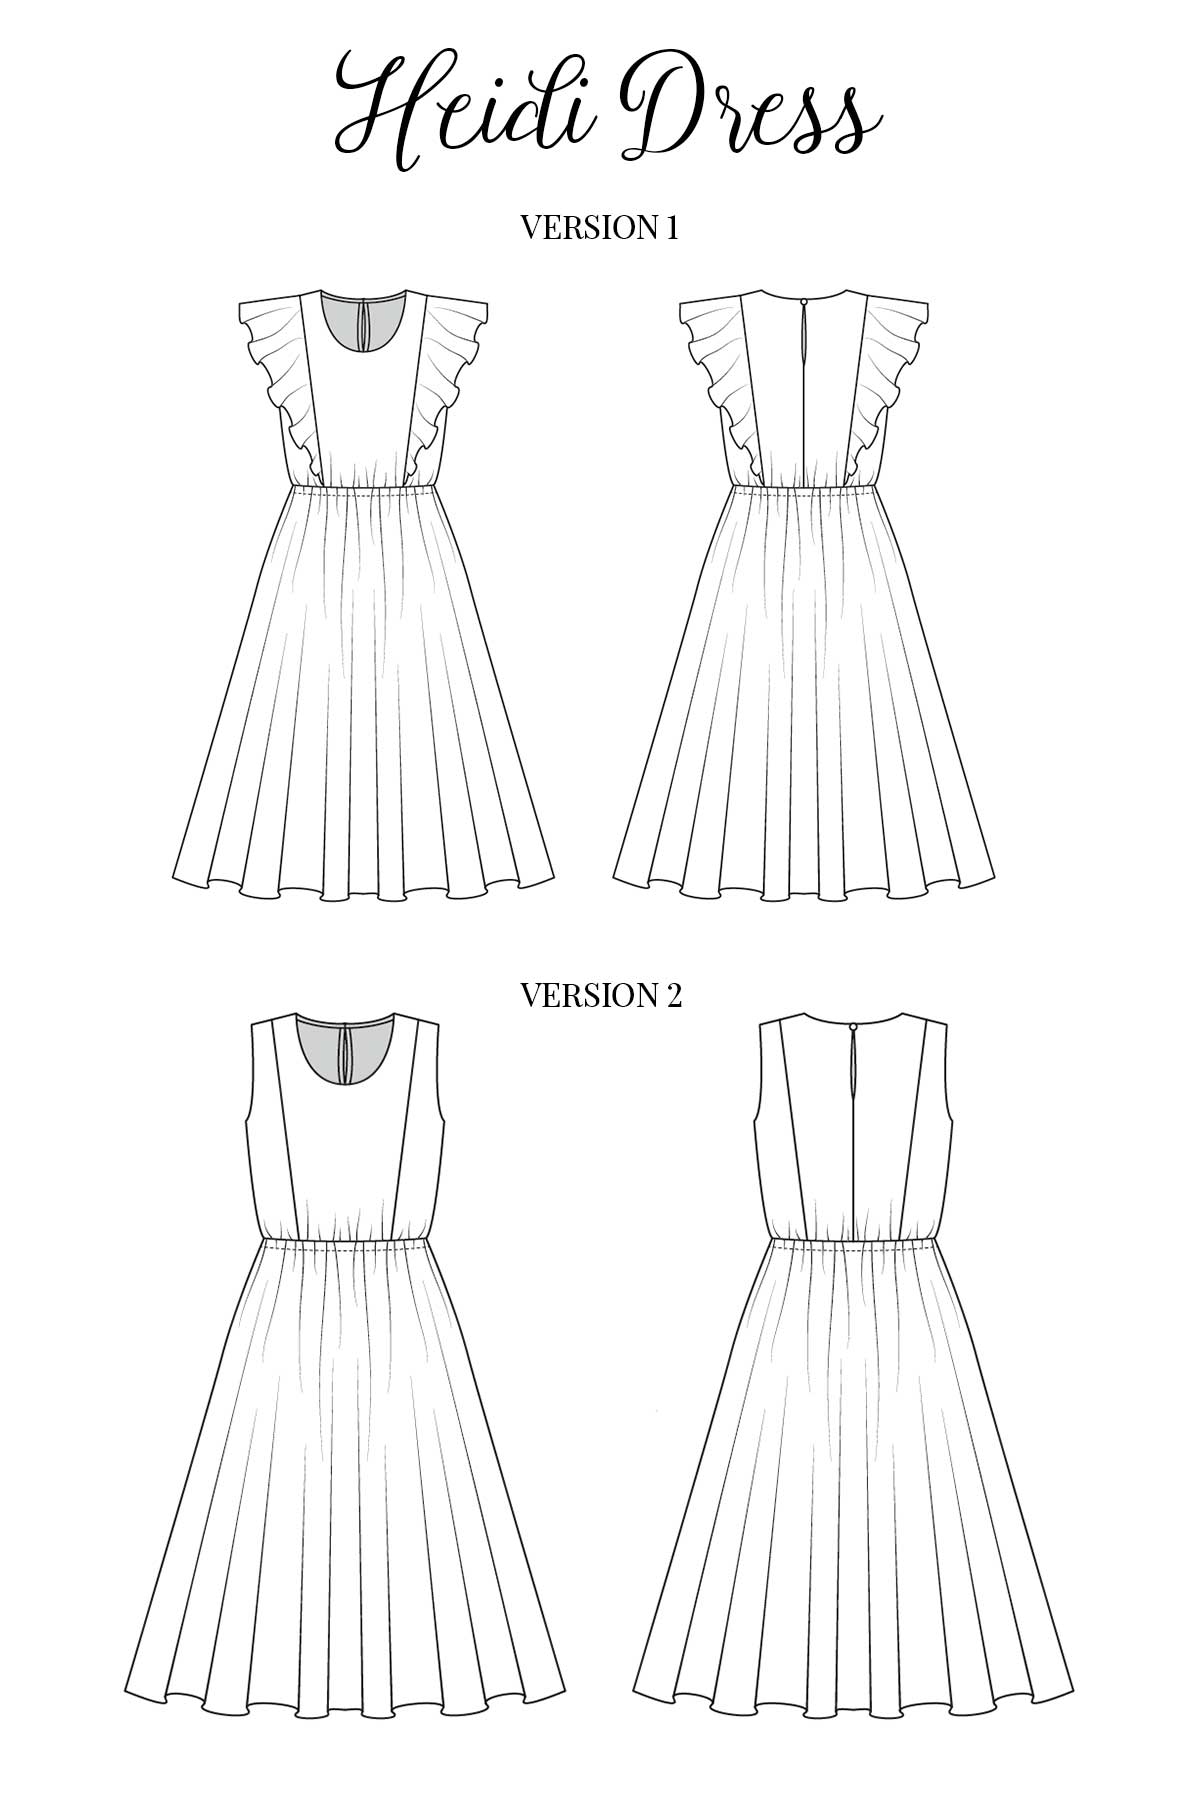
Both versions have princess seams on the bodice, an elastic in the waist, and a hook and eye closure on the back.
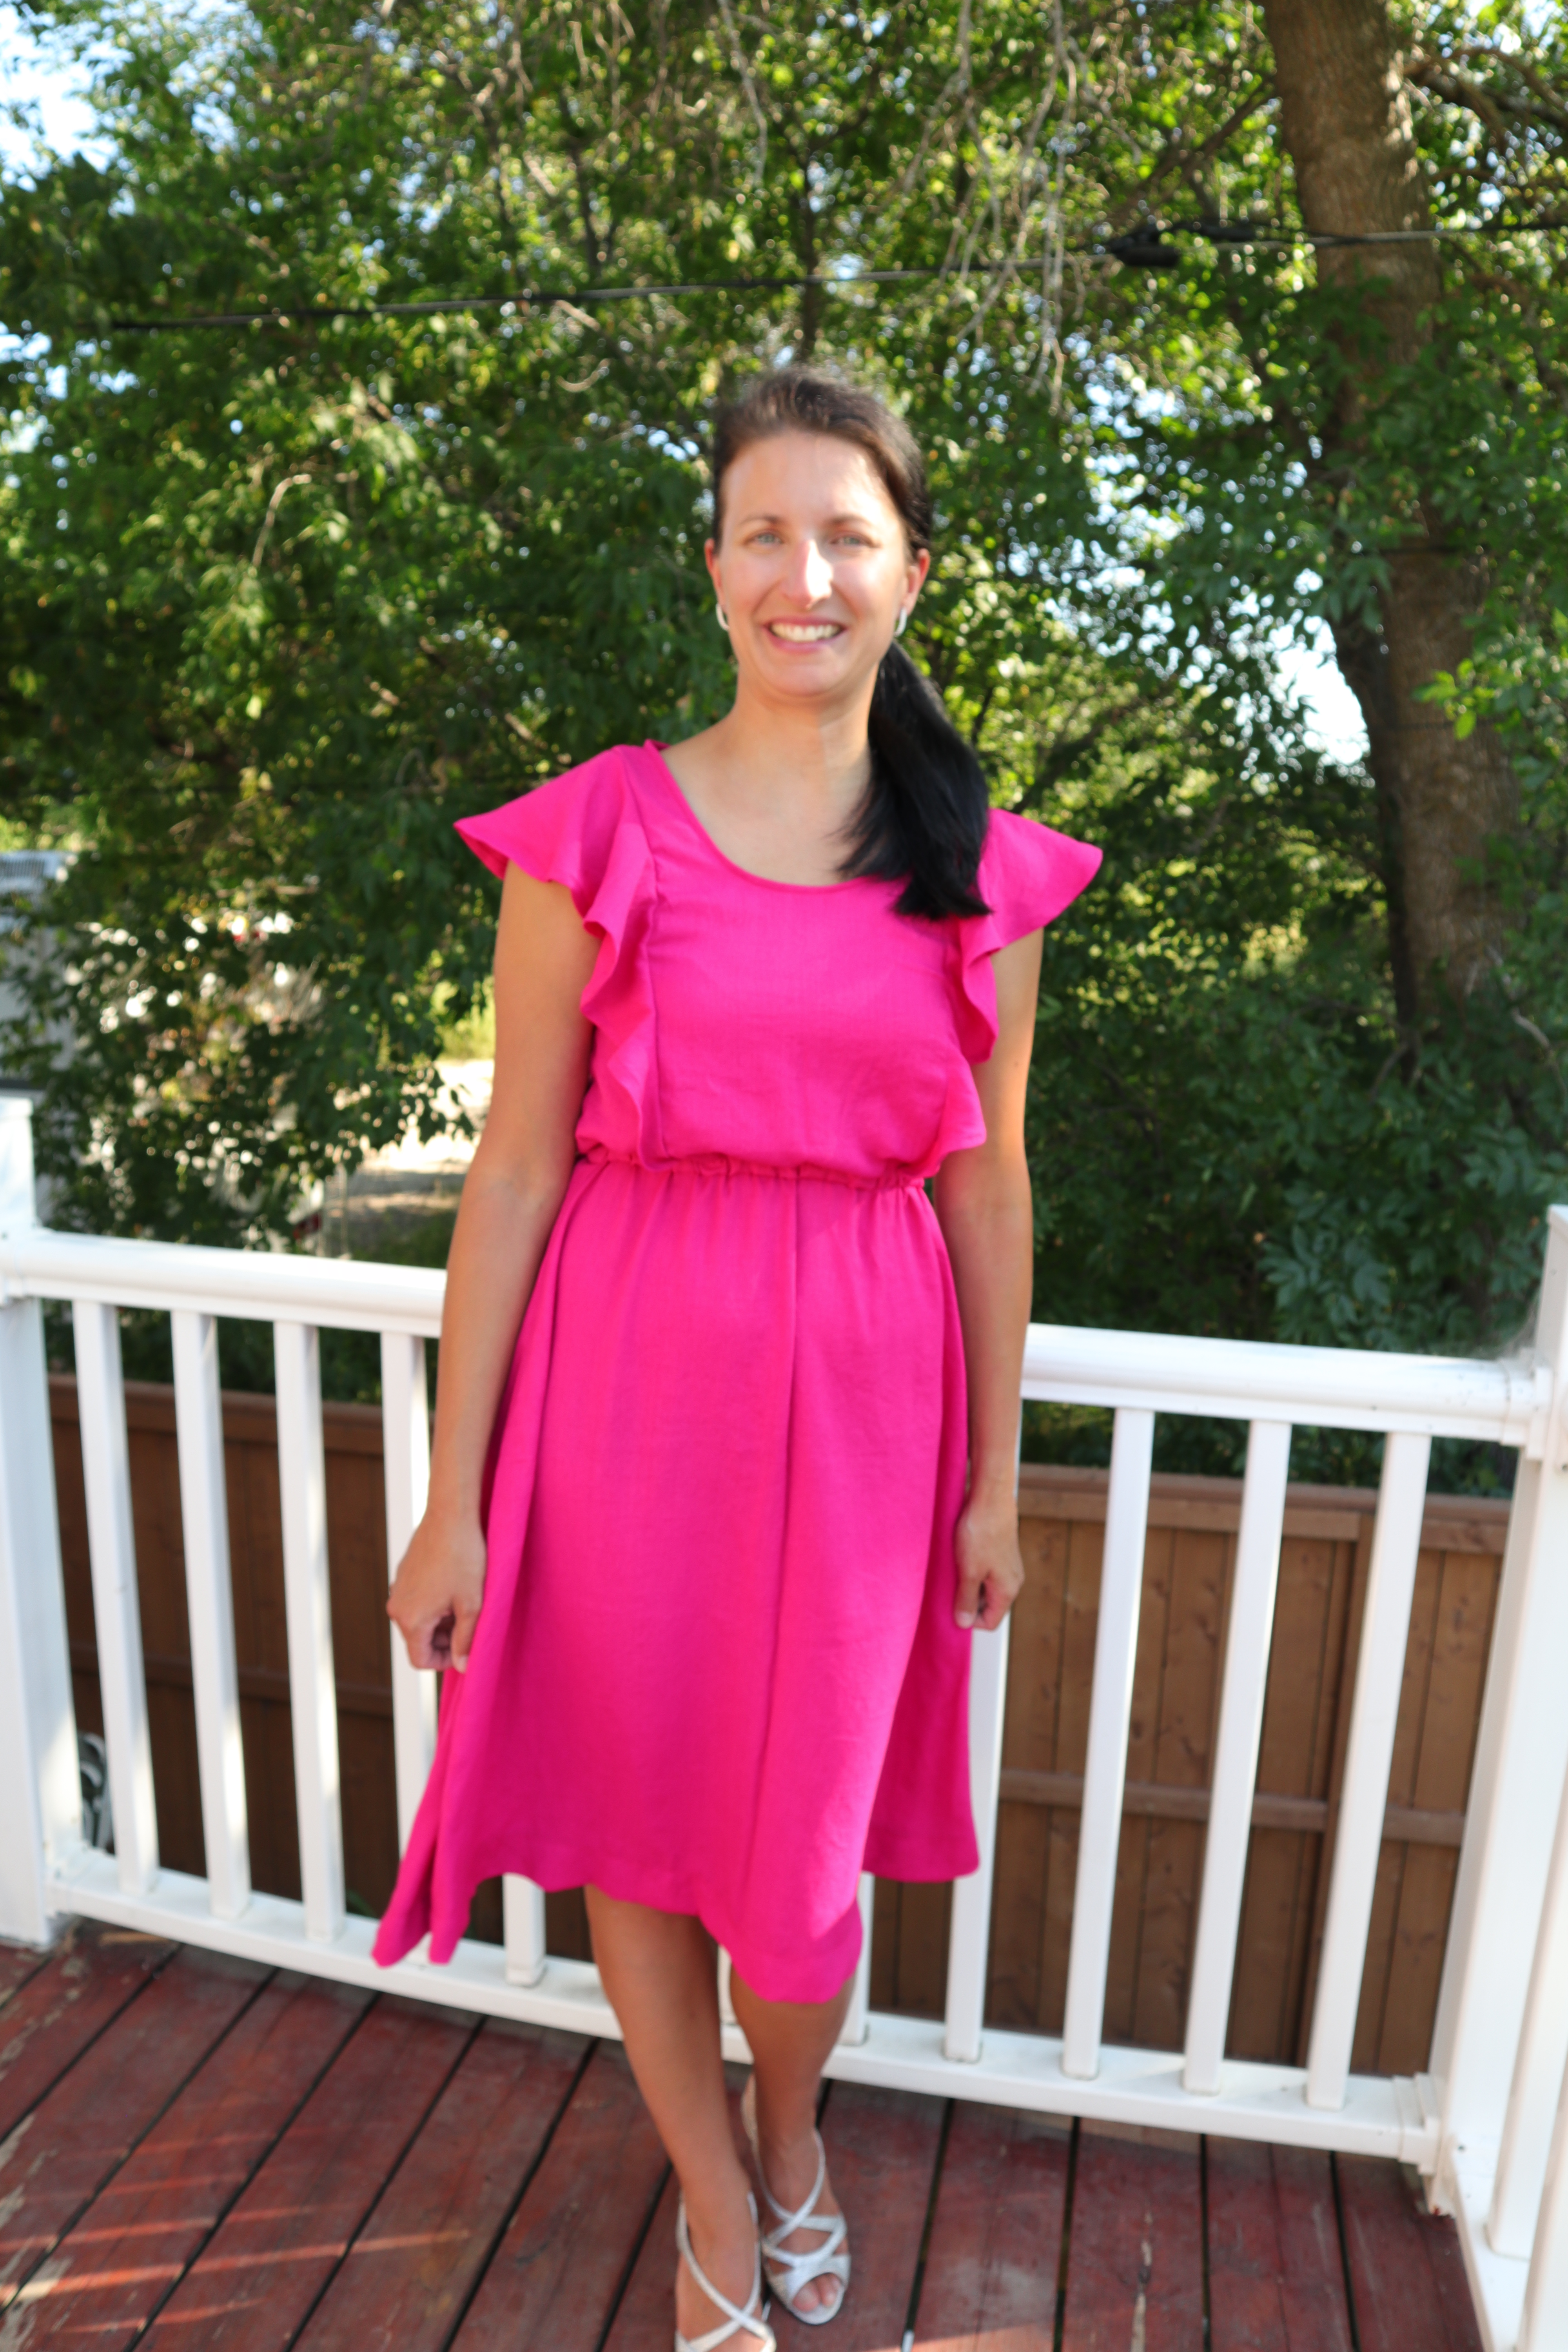
My Tester Version:

For my tester version, I made mine with a fabric called “Linen Look” and the fabric is composed of rayon and nylon.  I purchased it from my local Fabricland.  There are definitely some fabrics that are nicer to look at than to sew with, that’s for sure.

I first sewed a toile, using old bed sheets.  I sewed a straight size 12.

I thought at first that the size 12 was really really good.  I was almost shocked at how well it fit straight off of the pattern.  The only issue I found, it was a little tight underneath the arm while I moved my arm.

IMG_1571

For my final version, I shaved off 0.5cm from the underarm on both pieces (side front and side back bodice pieces).  I was really nervous because I honestly really try to avoid making changes, especially during a test.  Athina had warned me that the bias binding for my underarm may be a little short now due to my alteration.  I ended up cutting my bias binding a little longer just in case and it all worked out perfectly in the end.  I’m really proud of this alteration.  I need to be more brave in my sewing to make these kinds of alterations for future makes.

With making the changes on a bodice with princess seams, I drew out all of the seam lines and matched the pattern pieces along the seam lines and re-drew the underarm to make sure all of the pieces were the same and that I could keep the underarm the same shape and roundness (using a curved ruler).

IMG_1601

The only other issue, or difficulty I encountered during this pattern test, was hemming of the ruffles.  WOW!  I almost gave up.  I had wrote to Athina – apologizing for saying I was testing the ruffle version and I had asked her if it was okay if I just made version 2 without the ruffles for my final.  She said it was no problem.  But….my husband was the one who convinced me not to give up.

Now, I don’t want to discourage you at all.  I’m really happy that I didn’t give up, I mean, just look at my dress!

IMG_1593

In the instructions for the pattern, Athina even states that hemming of the ruffles takes time and patience and it really does!  I literally spent all of a Saturday afternoon hemming the 2 ruffles.  I messed up on the first one that I had to re-cut my fabric.  Hemming the ruffles on the curve, takes a lot of time, patience and a lot of pins.  I had to grab more pins from the stash!

Apparently, if you have a rolled hem foot for your sewing machine, it will make the task that much easier!  I even tried to do a rolled hem by hand, but that didn’t go so well.  That is something I would love to practice in the future – when I’m not on a time crunch.

But, with all that being said, don’t be discouraged….I mean, I didn’t give up and I’m so glad my husband convinced me.  Now, my ruffles aren’t perfect, but with practice, they will be!

IMG_1604

IMG_1617

Will I Make This Dress Again?

Absolutely!  In fact, I’m starting to really think about sewing the patterns that really speak to me a couple more times to get better practice at fit and pattern hacking.

Once I completed the ruffles, my husband suggested I should try a version with the ruffles, but to make the ruffles a little narrower than these ones.  He suggested little short ruffles that barely come off of the shoulder and I thought that was a cute idea.  There is also a Burda Style dress that has lace ruffles and I think that would be gorgeous as well, a dress with coordinating lace ruffles!  I just tried to find the dress on the Burda Style website, but was unsuccessful.  Once I can find a picture, I will update this blog post.

One more alteration I might do for a future make, is to shorten the bodice by 0.5cm – 1cm.  Maybe it’s the fabric choice, or the length of the bodice, but my final version the bodice bubbles over the elastic at the waist.  Looking at the other tester versions, I don’t think that is the way it’s supposed to fit.  Keep in mind that the cotton bed sheets are a little more stiffer than the rayon/nylon that I used.

IMG_1618

I really love this make and I’m just so proud of myself for not giving up and completing the ruffles.  Thank you Athina for allowing me to test your beautiful pattern!

Check out Athina’s website to see all of the tester versions!  You can click here.

Thanks for taking the time to read about my experience testing the Heidi Dress from AKpatterns.  The Heidi Dress is on sale for 10% off the regular price until Sunday August 9, 2020!

“We know you’d be with us today if heaven wasn’t so far away.” — Author Unknown.


Where Does Your Creative Inspiration Come From?

Hello Readers,

I’m here today to ask you:  Where does your creative inspiration come from?  Does it come from deep within you, does it come from your friends and family, how about social media, latest pattern releases or even new arrivals at your favorite shop?

The reason I ask this question, is because I want to know for my own self, how much influence does social media (mainly Instagram) really play in my sewing and creative process.  I know for a fact that as of lately, I’ve been spending much more time planning, dreaming and scrolling through and admiring photos of makes rather than actually making anything.

Now, this could be a mix of various factors, I’m not one hundred percent sure.  I know for sure that one factor is our world’s current situation.  I know for some projects there are notions that I need and some of these notions I really need to see in person rather than making an online purchase.  I’ve done curb side pick up with Michaels and it was wonderful.  My local fabric shop however, only has curb side pick up for mask making materials such as broadcloth, elastic and interfacing.  They do not have fashion fabrics for curb side pick up.

I really wonder though, if I spent less time scrolling and more time making – how much stuff would I be making and would the patterns, fabrics (colors and prints) that I sew with change.  Overall, I want to see if my inspiration changes.  In my personal experience, Instagram has a major influence in my sewing, which can be both a positive and a negative and right now, I’m thinking that it is negatively affecting my creative processes.  I have found in my personal experience that Instagram has become a negative space lately that is just draining my creativity flow.

I’m going to try an experiment for myself:

I’m going to use the rest of the summer (and possibly the fall) to really re-discover my love for sewing again without Instagram.  I’m feeling ready to try new things – such as making a bodice sloper and possibly drafting a basic top for myself.  I need to focus on the patterns that I choose and how they fit into my everyday life and work wardrobe.

How will I be doing this?

I will be taking a break from scrolling through Instagram.  However, I do have a couple sewing friends in which I communicate through Instagram.  I will still continue to communicate with my friends on Instagram.  I will no longer spend time scrolling through makes for some time.  In fact, this week, I have slowly reduced my time on Instagram and have made changes to the notifications that I receive.  So far, I have noticed a small change in my fabric choices already!  Ultimately, I want to spend much more time actually sewing, then scrolling!

I will continue to share with you through my blog and my vlog about my sewing makes and what I have been up to in my creative world.

Now, you’re probably asking – well why take the break from Instagram and not my blog or vlog?

The answer to that is, I really thoroughly enjoy writing and chatting about my sewing makes.  Typing up a blog post and editing a video are some added things that I simply love about my sewing journey.  I have also found a balance of reading and viewing other blogs and vlogs.  Right from the start of my blog and vlog, I’ve set aside time to read fellow bloggers blog posts and watch other YouTubers videos and it works well for me.


In the mean time, I’ve taken time away from Instagram this week and have made a plan of makes I wish to accomplish during this time.  I believe with this break from Instagram, it will allow me to stay focused on the plan that I set out for myself.  I’m notorious for making plans and then getting side tracked by, you know…..Instagram…….new pattern releases…….new fabric……you name it.

Here is a little sneak peek!

IMG_1523

IMG_1481

As I mentioned earlier, I’ve taken some time away from Instagram this week to really focus on my inspiration, and right now this color palette is really inspiring me to get sewing!  Just a note, not all fabrics are sewn and not all projects are listed (that’s all I could fit on my little board).

Wish me luck on my experiment!  I look forward to reporting back with these completed projects!

Please tell me, where does your sewing/crafting inspiration come from?

“I think of all the laughter, the smiles and all the fun.  My tears have once again begun.  For, although it brings me comfort to walk down memory lane it reminds me how, without you, life has never been the same.”  — Author Unknown

SMS Barkly Skirt Inspiration

I’m very excited for this post, it’s a little different from what I’m used to posting (with the help and suggestions from Paulette). I

One thing I have learned when it comes to the world’s current situation, is to have grace. When I first signed up to be a guest blogger from SMS this year, there were guidelines in place and I was ready for it. Then the pandemic hit, and people’s lives got turned upside down, but you just roll with it and do what you can with what you have.

So, this is a new kind of post for me, but I’m really excited! At the beginning of April, Meg from megsayssew on Instagram, showed us how to make a croquis. I took a photo of myself in my bra and panties against a light background (don’t mind my printer). I then print the photo and trace it onto a blank paper. I am then able to draw the various patterns with the fabrics and colors to see what the finished garment could potentially look like.

When I found out the pattern I was sewing for SMS was a go, it didn’t really give me much time to gather the fabric that I needed – heck I didn’t even know what the recommended fabrics were. Unfortunately, at the time of writing this blog post, I’m still waiting for my fabric to arrive, but that is okay! Why? Because I want to inspire you to try out this croquis method for your next sewing project.

IMG_1359

I scoured through the various fabrics available at Fabricville for what could potentially be ideal candidates for the Barkly Skirt pattern.

VR809-008-002

First one is this yellow mustard linen. It is such a fresh and vibrant color for the summer, plus the rayon and linen blend would be perfect for the hot months.

AR805-012-001

Next, I wanted to see how the skirt would look with a patterned fabric. I thought this Pansy Yellow linen fabric was a great for the summer months as well. In my personal opinion, because of all of the seam lines and panels in the skirt, I didn’t want to go with a patterned fabric.

My next thought was, color blocking. I’ve never color blocked before, but this could be the perfect opportunity to try something new, right?

IMG_1360

I tend to lean towards the rayon/linen blends, so for this color blocking, I really wanted to find 2 fabrics from the same fabric family. I thought a navy and a pink color would go well together, both are labeled as the same fabric a blend of rayon and linen.

IMG_1361

All of the fabrics that I chose were a either or a linen, or a linen/rayon blend. The Barkly Skirt also calls for denim, corduroy or cotton drill fabrics. You can easy make this a summer skirt and a winter skirt depend on the fabric that you choose. Another option I think would be great for my climate in the winter would be a corduroy version paired with a turtle neck top and a pair of leggings. Wait a second, I almost forgot, this pattern comes in 8….yes 8 different views with different panel variations!

Can you guess which fabric I decided to go with?! Stay tuned in the near future to see if your prediction was correct!

New to Sew My Style? Learn more and join in here.

Sew My Style 2020 includes these talented sewists, catch up on their #SMS20 posts:

Aaronica @ The Needle & The Bell | Leanne @ Thready For It | Ari @ Max California | Minna @ The Shapes of Fabric | Carol @ Chatterstitch | Michele @ WinMichele | Julian @ Julian Creates | Florence @ FTMom3 | Kelsey @ Seam Lined Living | Kris @ Sew Notes | Laura @ The Specky Seamstress | Samantha @ The Rural Sewist | Sarah @ Haraz Handmade | Shelby @ Handmade Shelby | Simone @ Intensely Distracted | and SMS20 Coordinator Paulette @ Petite Font

To stay up-to-date with all the #SMS20 news, pattern discounts and inspiration, be sure to subscribe to the newsletter at Sew My Style 2020.