Guess what day it is?!? It’s pattern release day!!
When pattern designers talk about a new pattern they are coming out with, I get really excited to see it – what will it be, a top, a dress, shorts…ect? Kimberly from Straight Stitch Designs had been talking on her Instagram stories about a new pattern she had been working on, so I was pretty pumped to see it (I really like her style)!
OH MY GOODNESS, when I seen the picture of her new sewing pattern, I absolutely loved it, I loved her whole outfit. Her new pattern is a beautiful vest, named Magnuson! She paired her Magnuson Vest with a white t-shirt and some jean shorts. I loved everything about it and when she did a call for pattern testers for this new pattern, I knew that I wanted to help her out and do the pattern test for her.
As always, when it comes to pattern testing, I always look for the cheapest fabric for the test. I found this viscose linen blend in the clearance section. On a side note, I had been searching online for a viscose linen blend to make my favorite pair of shorts. I was pretty excited to find this fabric. I hope there’s more colors at another location! Now that I know I love this pattern and that it will go with my wardrobe, I can splurge a little on fabric now!
Magnuson Vest, Straight Stitch Designs
Now, for the pattern test, it went fairly smooth. I took each step nice and slow. I learned a few new techniques along the way which is awesome! I learned how to do flat felled seams and how to attach a collar stand and collar – which brought some emotions. Last Christmas, I had promised my dad that by Christmas 2018 that I would make him a shirt – dad always wore collared button up shirts. So while doing the pattern test, I felt that a part of my dad was with me as I was learning to do the collar portion of the vest. This would have been the perfect practice for making a collared shirt for my dad. I know my dad would have been proud. Boy do I ever miss him.
This pattern features 4 pockets, a collar and collar stand, a waistband and 5 buttons. This pattern also has flat felled seams, which then creates a beautifully finished garment from the inside as well as the outside. That it probably my most favorite part about this whole pattern, is how Kimberly planned each step to make this beautiful on the inside.
I thoroughly enjoyed testing this pattern and I plan to make a couple more of these, I’m thinking I definitely need a black one!
Kimberly has the Magnuson on sale during the release, you can click here to see the pattern. Grab it now while it’s on sale, you’re going to love it!!
Thank you for taking the time to read about my experience pattern testing for Straight Stitch Designs!
“I can no longer see you with my eyes or touch you with my hands…But I will feel you in my heart forever.” — Author Unknown
Each week, or each month I try my best to make a sewing plan….but rarely ever follow it. Projects and things come up and I just go with the flow. The plan really changes based on what inspires me, and trust me, my sewing plans can change daily to even hourly. I really do try to stick to my plan, but sometimes I just need to follow my inspiration as it plays a big role when it comes to my motivation for sewing.
My friend has been upping her sewing game these last few months, she’s been sewing such complex projects and even drafting her own patterns based on inspiration from pinterest. Check out this dress that she made for the Royal Wedding Sew Along. Isn’t it gorgeous? I hope to one day make something like this, but I have a lot to learn before I get there, such as sewing clothes that fit my body. One evening, we were chatting about sewing clothes that fit and about our body measurements. She offered to help me understand my body measurements and what to do with these numbers. I like to think of her as not only my friend, but my sewing mentor as she is very knowledgeable and helps me out a lot with my sewing. I’m really fortunate to have her helping me and sharing her knowledge with me.
Sewing these pants, was not in my immediate plan, but if I was going to learn something new to improve my sewing game….then I’m up for the challenge.
comparing my body measurements with the pattern piece measurements
It started off by, I was going to sew a dress and I was concerned about the size and so my friend helped me by instructing me how to take my body measurements and to measure my measurements up against the actual pattern piece. I took a pause from the dress and wanted to try this technique with these pants, Simplicity 8389.
First, I needed to pick a size on the envelope based on my hip measurement. According to the sizing chart for this Simplicity pattern, I am a size 14. So if you would have asked me last year if I was team cut, or team trace, I would have told you that I’m team trace. I was team trace for the longest time, because I often thought about my mom and if she would want me to sew her one of these patterns one day. This way, I would have all the sizes that I need. 2018 has really changed my sewing game, I’m more into indie patterns this year, and I have also switched to team cut. The reason why I changed to team cut is because when I would trace out a pattern, I only really traced out the pattern shape lines and not the adjustment lines. My friend has really pushed me with my sewing and has helped me out a lot with understanding the importance of adjusting patterns to fit you and your body measurements. Now, to trace every single line on a pattern is really a lot of work (and I’m not into that), and with tracing you also run the risk of the paper shifting and therefore your whole pattern shifting – which has happened to me before. So I have since then switched to team cut, actually Simplicity 8389 was the first pattern that I cut out! I figured, if someone really wanted me to sew them a certain pattern, then they can always supply me with the pattern (if we are different sizes). This brings up another point as to why I’m more into indie sewing patterns this year as well. Most indie patterns come with a layering feature, meaning, when you print the pattern you only need to print your size. So if my mom likes an indie pattern (such as the Joy Jacket) that I have sewn, then I go back and print out her size. Once you cut the Simplicity or McCalls size out, that’s the only size you have, that’s why I like indie patterns, because you can keep all of the sizes on your computer. Now, with that being said, some indie sewing pattern companies only sell you one size, so not all companies are like that.
adding length to the crotch curve
Once I cut out my size from the pattern paper, I then had to draw out the seam allowances on each of the pattern pieces. The pattern will tell you what the seam allowance is. Once that was completed, it was time to start measuring the pattern pieces and compare those measurements to my body measurements. First I started off measuring the crotch curve, the waist, hips and lastly the length. From this process, I found out that the back crotch curve on the pattern piece needed to be lengthen to match my measurement, and of course, I needed to add length to the legs(which was no surprise!).
Simplicity 8389, view D
Now, I still wasn’t sure if this style of pant would suit my body type. Once I sewed it together, the legs were a big too baggy for me, so I ended up taking them in a bit below the hips to the ankles. I also believe the type of fabric that I used could have been a cause as to why they were so baggy. I lengthened the pattern so that these pants would be long enough, but with this fabric I prefer to roll the hem up and have them as capris. I really love the coral colored pants on the cover of the envelope and I hope to find fabric like that one day. I emailed Simplicity and asked them what kind of fabric was used to make the coral pants. They replied, and the fabric that was used is a washable silky type of fabric – interesting. This is a floral cotton that I got in the clearance section of my local fabric store. I’m hoping to give this pattern a try in a linen type of fabric.
Tangerine Floral Cotton
I had some left over fabric laying around from a project that I tried last summer, I had enough to make the shorts version of these pants. I took a picture of the fabric and sent it to my friend – I had thought it was a linen type of fabric. She suggested that it was a canvas type of fabric. I figured I’d give the shorts version a try.
Simplicity 8389, view C
I have a pair of ready to wear shorts from one of my favorite shops that I really love the feel and the fit of them (I have 3 pairs of them – grey, blue and fuschia). I’ve been on the hunt for a pattern similar to my favorite shorts. Although I love these shorts in the canvas fabric, they don’t quite make the cut with my favorite pair of shorts. I think that the pleats on the front just add extra fabric to the shorts making them appear a little too wide for me. My goal is to find a beautiful linen fabric and make a pair of my favorite shorts this summer, but I’m not sure if I will use the Simplicity 8389 pattern for another pair of shorts.
My friend encouraged me to trace out one of my favorite shirts – which is seen here in the previous pictures, the grey shirt is my favorite to wear in the summer. I traced the grey shirt, and made the pink shirt, I think this pink shirt turned out very similar to my favorite grey tshirt. I will definitely be making more of these (it was fairly easy!). So that got me thinking, that I might need to do this process with those shorts of mine, trace out my shorts and try to make them soon. I believe tracing out the shorts might not be as easy as the tshirt was, but at this point in my sewing game, I’m up for the challenge.
Thank you for taking the time to read about my experience sewing clothes that fit my body.
“What I’d give if I could say, “Hello Dad” in the same old way to hear his voice and see his smile, to sit with him and chat for a while. So if your father is still here, cherish him with care, for you’ll never know the heartache until you see his empty chair.” — Author Unknown
Got my red rose tea in my favorite cup! Let’s get started! Just a heads-up, this may take a while.
When it comes to sewing, I’ve developed the attitude “Oh, I can make that!”. If you put your mind to it, you can really sew anything that you want to!
Emily, who I follow on Instagram from @emilyhallmandesigns embroidered a beautiful black sweatshirt with silver flowers in her black and white collection, you can see her blog post here. I absolutely loved this collection that she made, it is probably one of my favorite collections of hers. She also embroidered stars on a white sweatshirt and did some bead work on a grey sweatshirt as well. Emily showed us the process of the embroidery. During her first attempt, her fabric got caught in the machine and ripped a hole in her shirt. Not all was lost, she had used that experience as an opportunity for practice and for learning.
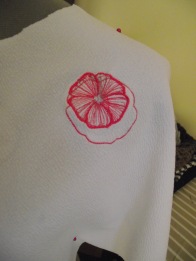
Prior to getting my machine, I had watched a lot of videos and had done my research. Once I got my machine, I purchased a couple different stabilizers and embroidery thread. I had done a couple practice embroidery designs and I figured it was time to make something – as the stabilizers and thread were not cheap, I didn’t want to waste my money on all practice and no projects. After embroidering a beautiful pink flower, I decided that I wanted to make a t-shirt similar to Emily’s black sweatshirt concept. I had white knit fabric that I wanted to use to make a shirt to go with my hot pink Morgan Jeans. I figured with hot pink flowers, the shirt and jeans would go perfect together.
If you follow me on Instagram, I shared the beginning process of the shirt on my Instagram stories.
After having a couple practice rounds of embroidery, I figured I was ready. I picked the Zoe Knit Relaxed Tee pattern from Sinclair Patterns. First, I cut out the front pattern piece and I hung it on my dressform. Next, I placed the practice embroidered flower on the fabric to see where exactly I wanted the flowers to go. I marked the locations with a fast-fade marker. The marker was fading too fast for me, so I pinned the locations of the flowers instead. After I determined the locations of the flowers, it was go time! I shared on Instagram stories, the process from start to finish, starting with loading the flower on the software, to attaching the stabilizer and fabric to the hoop. I did it this way, because a couple of my sewing friends are also interested in purchasing an embroidery machine. This way, my friends got to get a feel for the machine and software.
Starting to embroider
Boy oh boy, was this ever a learning experience for me. Luckily, the white fabric was in the clearance section at my local fabric store. If you haven’t been able to tell yet, this year I’ve been trying to stick to the clearance section in the fabric store.
Are you ready to talk about each flower and what was learned from it? Okay, here we go!
Click and drag to resize the flower.
This flower, I had made the mistake of highlighting the flower, and dragging the corner of the image to reduce the size, similar to what you would do in Microsoft Word to make an image smaller or bigger. When I did that, it had left me with the original size flower outlined, and then the size of the flower I wanted on the inside. I did not realize that it was going to embroider the larger flower outline. I thought, “that’s okay! I’ll make this work, and do another one!”.
Reduced the flower size to 75% of the original.
Now, for the next flower. I knew I had wanted my flowers to be scattered and of various sizes. So for this flower, I had reduced the size to 75% of the original 100%. At this point, I had not realized that there were wonky lines in the flower petals on the computer screen. Basically, what the image looks like on the computer screen will be the exact image that gets embroidered. That is what I should have learned from the first flower, but that’s okay because this is a journey about learning and growing from these experiences.
The perfect embroidered flower. No wonky lines here!
To the left, is pictured what the flower should look like. This is exactly how my very first practice flower turned out, isn’t it beautiful?
Now, after a couple failed attempts, I was feeling pretty defeated. My husband told me not to give up, so I ended up staying up until 12:30am and got the perfect flower on my t-shirt. It was then time for bed.
The next morning I got up and was feeling pretty good about these flowers again and decided to try to add 1 more flower. This time, the fabric got stuck and almost ripped a hole, luckily I caught it before it ripped a hole. This is when I simply gave up. I figured, enough with the flowers and just sew the shirt together already. I wanted to see how this machine would work as a normal sewing machine and forget about the embroidery part for a bit. I sewed the Zoe shirt up fairly quickly. I absolutely love the Zoe pattern and believe that this pattern will be my go-to pattern for the summer.
For the remainder of the day, I kept researching about the embroidery aspect of my machine, as I really wanted to make this work. I started browsing through the designs again and found a lovely abstract flower looking design that I wanted to try with the exact same fabric. I took it slow and steady and the black abstract flowers turned out beautiful! Not a thread or a needle broke during this process. The conclusion that I have gathered at the time of my experimenting, is that the pink flower was simply too dense for the type of fabric that I chose. The pink flowers have roughly 7000 stitches, where as the black designs have 2025 stitches. After sharing my experiment process on my Instagram stories, a friend of mine suggested that perhaps I try using a different stabilizer – which I later found out from another friend that I need to use two stabilizers!
Embroidered Zoe Top – Pattern by: Sinclair Patterns
After watching my Instagram stories and hearing my brief but great review on my new embroidery machine, a close friend of mine purchased the exact same machine as well. What was even better, is that when she went to the store for the specific embroidery thread, the lady at the store told my friend all about the stabilizers that need to be used when embroidering. Luckily my friend shared this information with me! With the pink and the black flowers, I was only using a stabilizer on top of the fabric, called Solvy Light – which washes away with a bit of water. What I didn’t know, is that you need to use a temporary fabric adhesive spray to attach the Solvy Light on the top of your fabric, AND, you also need to use a stabilizer on the bottom of your fabric. Depending on your fabric, you will need to use either a cut away or a tear away stabilizer.
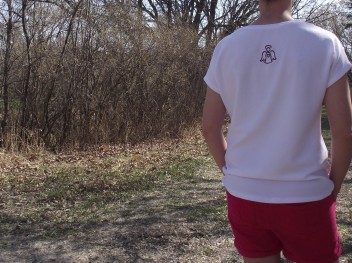
First embroidery using the proper stabilizers
Right here, is my first attempt using the 2 stabilizers, Solvy Light on the top and a cut away on the bottom. This is the angel that matches my sewing labels. I think it turned out pretty awesome! Overall, I’m really happy with my new machine and the work that it does. I will be writing a blog post next month about the machine and the features of the machine. I’ve been playing around with my machine so that I am able to provide you with a good quality review. I’m really excited for the future of my sewing with the embroidery machine – the possibilities seem endless!
Thank you for taking the time to read about my experience with my new embroidery machine. My Zoe shirt was inspired by Emily Hallman.
“I wish there were visiting hours in heaven.” — Author Unknown
Friday Pattern Company had posted a pattern testing call for multiple new patterns in the works. I took a peek at the list and I signed up to be a pattern tester for the knit dress. Luckily, I was a chosen tester for the knit dress. Now, I had no clue what the dress looked like, so I was taking a chance that I might or might not like the dress.
Oh my goodness, when Chelsea sent out the email with a photo of the dress I was really excited to sew this style of dress. It is the perfect style of dress for the summer, I can definitely see myself sewing a few more of these for the summer. If you are looking for a nice flowy dress for the summer and something easy and quick to whip up…this is the one for you! It is called the Hilo dress and it is drafted in memory of Chelsea’s grandmother.
I decided for the pattern test that I would look for cheaper fabric, just in case this style of dress did not suit my style, or that I simply would change my mind and not like the dress. That’s the one side of sewing that I struggle with – I see a lot of beautiful patterns and sometimes you sew them up and find out quickly that it does not suit your style or your body. But with that being said, nothing is ever lost from sewing a garment that doesn’t suit you. It’s all about learning and the process. That’s why for my first go at a pattern, I usually start off with cheaper fabric. I found this peach/pink floral knit fabric at my local fabric store in the clearance section. I wasn’t too crazy about the print at first, I just really liked that it was pink and I really, really liked the price tag! Sometimes with choosing a print fabric, it can be difficult to visualize how the garment will look with that printed fabric. So at first, I wasn’t too sure how this print would look in this style of dress.
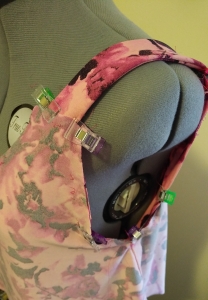
Never gave up. Kept trying to sandwich it all together.
The pattern consists of 6 pieces, 2 fronts and 2 backs and 2 straps, that’s it! This dress is super easy to whip up in one evening. Now, since I consider myself a beginner sewer, usually my first go at a pattern is a little bit slower. Plus sometimes I just over think things and make it extra complicated on myself. But once I figure out a pattern, its really easy to whip up another one. With my first go, I struggled at attaching the top of the dress to the bottom of the dress, the seam ripper was my best friend that evening. After a few tries pinning and unpinning the dress together, I finally figured out how to attach the 2 pieces. The picture to the left shows my one of many attempts to sandwich the 2 pieces together, which is wrong (don’t do it this way! ha ha), but its all a learning experience. For the future and if you get stuck on this step as well – the straps need to be in between the 2 pieces and not sticking out like in my photo.
Once I finished I immediately went looking through my fabric pile to see which fabrics I could use to make another one! Like I said before, this dress is absolutely perfect for the summer. I have extra pink floral from this dress and I have 3 meters of a pink solid knit sitting around. I pinned the solid pink knit just on top of the floral dress and I seen another dress coming right up.
One of my goals for 2018 is to get better at photography and to take more pictures with a real camera and not just the cell phone camera. This is not strictly a sewing goal, I decided in the beginning of December that I wanted to take more family, nature and sewing photos. I want to be able to use good lighting in my photos as well. Since it was still pretty cold here (when these photos were taken for the pattern testing assignment), this photo to the right was my attempt at taking photos inside the house using the natural light with a white backdrop. I think it turned out okay!
I must say, I thoroughly enjoyed being a pattern tester for the Friday Pattern Company. It’s important for pattern companies to make sure their patterns are free from errors and that their instructions are clear so that individuals are able to make sense of the instructions and are able to construct a beautiful garment at the end of the whole process. I’m very pleased with the way my Hilo dress has turned out! The one thing I really love about this pattern is that there is no correct front or back, both the front and the back are identical. With that being said, the pattern does have 2 versions: the version that I made is a bra-friendly version, meaning that my bra is covered from the back and essentially the front and the back are identical. The second version of the dress has a lower back, which then you can definitely tell which is the front and which is the back of the dress. If you are looking for a beginner friendly summer dress, the Hilo is the one for you!
Thank you for taking the time to read about my experience being a pattern tester!
“Our hearts still ache in sadness, and secret tears still flow, what it meant to lose you, no one will ever know.” — Author Unknown


 Kimberly has the Magnuson on sale during the release, you can click here to see the pattern. Grab it now while it’s on sale, you’re going to love it!!


 One of my goals for 2018 is to get better at photography and to take more pictures with a real camera and not just the cell phone camera. This is not strictly a sewing goal, I decided in the beginning of December that I wanted to take more family, nature and sewing photos. I want to be able to use good lighting in my photos as well. Since it was still pretty cold here (when these photos were taken for the pattern testing assignment), this photo to the right was my attempt at taking photos inside the house using the natural light with a white backdrop. I think it turned out okay!
")

")
